

How To Apply Eye Makeup Step By Step With Pictures
Overwhelmed with all the eyeshades? OR wondering what's the best eyeshadow look or colors for your eyes. Here's The Ultimate Guide on How to Apply Eyeshadow for Beginners!
And pro Makeup tips to finally master the perfect eyeshadow technique for your specific eye shape, recommended tools, how to use them, and the all-time eyeshadow colors to enhance your eyes like a pro.
Allow'due south get started.
I have to exist honest with you. I honey those Youtube Makeup videos! I remember they are so helpful and adept for Inspiration.
However, there are some center makeup basics principles and techniques that we demand to know as beginners, and decoding those youtube videos takes so much time!
Allow's start with the nuts, and so I'll show you crucial prep steps and essential tools to use eyeshadow, and at the terminate, yous volition find 5 unlike eye makeup looks to start practicing today with pro tips for every heart shape!
This post may incorporate affiliate links. That means if y'all click and buy, I may receive a small committee (at cipher cost to y'all). Please see my total disclosure policy for details.
Middle Makeup bones Terminology
Every Makeup tutorial points towards a specific part of the eye, and we barely know eyelid and waterline, right? Some center terms are essential to name for Makeup.
Here'due south an Centre makeup terms and parts Diagram

Brow Bone

The brow bone is the surface area of the eye right below the eyebrow where you can feel the os. Usually, this area is as well known as "The Highlight surface area" because it is one of the high points where y'all desire to apply highlight.
The brow bone needs to be highlighted, and a common fault is taking the eyeshadow towards the brow bone without leaving at least a minor space to use a lighter/highlight shade.
People with big forehead bone or an excess of skin falling from it (Specially Hooded eyes) need to be careful when highlighting this expanse. We desire to add together a pop of highlight, merely nosotros don't want to heighten even more the brow bone and suppressed the remainder of the heart.
The best fashion to highlight the forehead bone for those cases is by adding a thin line of highlight only below the eyebrows without taking it down to the balance of the eyelid.
Here's a full tutorial with more details near the all-time Eye makeup tips and tricks for Hooded eyes.
Crease

The crease is the fold or line that divides the eyelid's mobile part with the static eyelid.
Oftentimes this surface area is deepened by applying dark eyeshadow.
For Monolid eyes and Hooded optics, it is more difficult to find their crease. A pro tip is to create a "false crease" where information technology is supposed to exist the pucker to create the illusion of bigger eyes and a defined crease.
Related Makeup post: How to cut-crease for Hooded Optics (with pictures!)
Eyelid
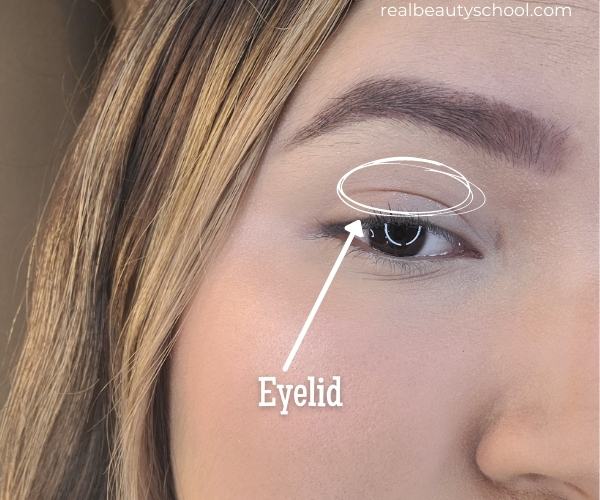
The Eyelid is the mobile office of the heart right below the crease.
And this is also divided into the inner corner and outer corner.
Inner Corner
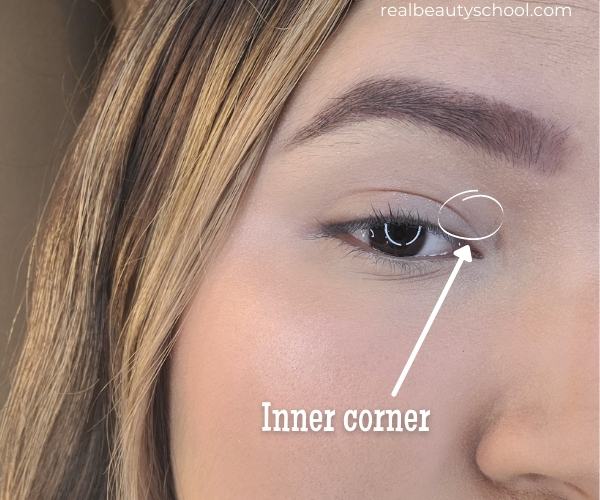
The inner corner of the heart is the area of the eyelid closer to the tear duct.
You lot want to utilize light shades to the inner corner to make your eyes wait bigger and awake, especially if you lot have close-set eyes.
Halo eyes and Smokey eye is the exception for this.
Outer Corner

The outer corner is the eyelid area closer to the end of the eye, towards the hairline.
This Eye role can also be called outer 5., and information technology'south because you need to image an inverted V in the outer corner of your eye between the cut crease and the lash line for some eye makeup techniques.
Dark shades go well on this area, and information technology's more mutual to deepen this area especially using the inverted V technique. (more about this beneath)
Waterline

The waterline is the lash line'southward internal expanse that is closer to the centre, and it is watery.
In that location is an upper and lower waterline, and you can utilize eyeliner (usually pencil eyeliner) on both, taking extra precautions since it is a super-sensitive area of the eye.
If you want to brand your eyes look small or deepen your eye makeup expect apply black pencil eyeliner, AND if you're going to brand your middle await more prominent for a natural makeup look, use white/beige pencil eyeliner.
The next tip might be super obvious, but NEVER employ powder eyeshadow on the waterline. This area is delicate, and even pencil eyeliners that are "designed" for this purpose can cause irritation or infections.
Tearduct

The tear duct is the wet area in the inner corner of the eye. The tear duct must e'er be highlighted, which means yous can use either a shimmer light shade or your highlighter on this area to become a cute terminal impact on your eye makeup look.
Trust me, and it actually makes the deviation between a highlighted tear duct vs. a not-highlighted ane in terms of making the makeup expect more clean and professional.
Lower lash line

The lower lash line is the area correct below the lower lashes.
For natural looks, apply lighter eyeshadow shades on this area, and for more dramatic looks, apply dark shadows or eyeliner.
Upper lashline

The upper lash line is the surface area correct in a higher place the upper lashes, and hither'south where the eyeliner goes for a coincidental eyeliner, winged eyeliner, or eyeshadow eyeliner.
Eyeshadow Essential tools
Equally a Makeup Artist, I honestly believe that the Key to a perfect eyeshadow look is the TOOLS! I can make any eyeshadow work if I have the right castor and vice versa. Even the best eyeshadow formulation can end in a total disaster with a poor-quality brush.
I have a complete makeup brushes guide with a free printable of the essential makeup brushes for the face, optics, and lips. Notwithstanding, for this post, I will comprehend but the necessary makeup brushes to apply your eyeshadows.
Eyeshadow brushes guide
Blending castor
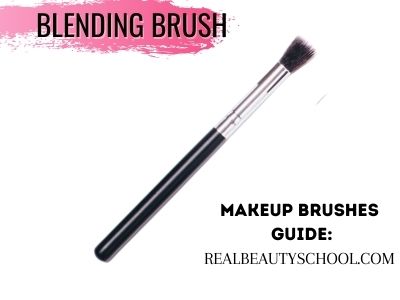
I retrieve every person who does eye makeup needs a GOOD blending brush in their kit. This brush makes the total difference when y'all are trying to create a professional person-like eyeshadow wait.
The correct blending technique is essential to make the eyeshadow look flawless, and y'all tin not reach it without a blending brush.
The blending brushes tend to exist fluffy, with soft hairs that blend so easily whatever pulverisation eyeshadow. I recommend a medium-sized blending brush and probably have a smaller one, and a bigger one volition better the blending technique besides.
Pencil brush
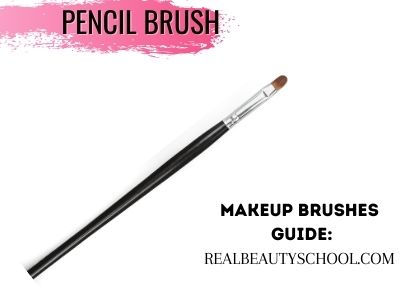
The pencil brush is a small eyeshadow makeup brush with a pencil shape, every bit the name says. With this brush, you tin apply eyeshadow more precisely but at the same time distributing the production to the desired area without leaving harsh lines.
I love this type of brush, and it is a must for nigh whatever eyeshadow look I do! I often use it when I want the shade on a specific surface area without taking it all over the eyelid, but I don't want it to look patchy.
Use it with padding motions to add together color and circle motions to blend the shade.
Flat small castor

A small flat brush is a precise constructed brush that volition apply and set the color in place, especially when the eyeshadows have a texture like shimmers or glitters and wet products like concealer or eyeshadow primer. This ane is perfect for applying those highlighter/shimmer shades on the brow os's inner corner and cutting the crease with a concealer.
Eyeliner brush

Eyeliner or eyebrows angled manner makeup brush is a must-have in your kit for when yous want to create an eyeshadow eyeliner, identify the shades in a precise point or for the bottom lashes.
The eyeliner brush is one of the brushes that yous need to have at least one on your kit because yous can't get the same effect with whatsoever other blazon of castor.
Other Essential Heart Makeup tools
Related Makeup mail service: How to Fake a Face-elevator with Makeup! (Pace by step Tutorial)
Concealer
Concealer in makeup has many uses like covering night circles, marks, pimples, brightening the under middle, or contouring.
And for eyeshadow application, it is also an important product to take when y'all want to cut the crease, or clean/fix a winged eyeliner or eyeshadow.
I'thou so IN love with the Tarte shape tape full coverage concealer! It'south my get-to when I want the concealer to stay in place all twenty-four hour period long, whether It is on my nether eyes or eyelid to cutting my pucker.
It is a matte kind of drying concealer (perfect for oils skins and the summer season). However, I found a manner to make information technology expect flawless and natural even in the wintertime flavour, and I share information technology in my not-creasing concealer tutorial.
Eyeshadow primer
I got to be honest. An eyeshadow primer is not an essential product for everyone. If you have oily lids, it is necessary, though. I recommend this eyeshadow primer here if you lot want to set oily eyelids.
But for most people, using a foundation or concealer to prime the eyelids should be enough. Especially for a total coverage expect when you want to even the eyelids skin tone.
Mascara
The lashes are a vital step for any makeup look, and even if you desire natural middle makeup, some honey and color on your natural lashes will heighten those optics to make them look more awake and bigger.
Simulated Eyelashes
Even if yous accept cute, naturally curled eyelashes applying a beautiful pair of faux eyelashes improves the centre makeup enormously. Honestly, not everyone has those perfect eyelashes. In my case, I accept small hooded eyes with tiny lashes, and applying false lashes makes my eyes look bigger and more pretty.
For a natural eyeshadow expect, try this type of natural-looking lashes, a reasonable size, and a clear band.
Bank check this pace-past-stride simulated eyelashes tutorial with my exclusive pro tip that makes my lashes awarding then much easier!
Accept you heard about magnetic eyelashes? Those can be a solution if you detect the glue lashes challenging to work with. They literally stay in identify all 24-hour interval without whatsoever retouch and feel super lightweight.
I have a Magnetic Eyelashes with eyeliner guide with a step-by-step tutorial, how to properly employ the magnetic eyeliner and how to remove the lashes then they last longer.
Black Eyeliner
Black Eyeliner is a must-accept equally well. I highly recommend you having both pencil and liquid eyeliner. The easiest way to manage a blackness eyeliner is by using a waterproof pen eyeliner and this waterproof eyeliner here is the absolute best!.
I have Deep-ready hooded eyes, which means that when I open my eye, my lash line is almost covered by my upper lid and having a Expert waterproof eyeliner is essential to prevent having a mess on my eyeshades.
On the other mitt, a black pencil eyeliner like this one hither will allow yous to create more than depth on the center makeup look using it on the waterline or a cute blended eyeliner applying it on the upper lash line.
If you want to add together a pop of colour and be more creative, you can also opt for colour eyeliners similar this ready here.
Biscuit pencil eyeliner
Use a beige pencil eyeliner on the waterline to brighten the eye and make it look bigger and more awake. This simple fob that y'all can make in seconds will make your heart look more lifted and youthful. And it is a must-exercise if you have pocket-size eyes.
Eyeshadow Palettes
There tons of eyeshadow palettes with tones of colors and shades out in that location, just we want to start with some basic eyeshadow palettes that I called "the foundation" of our eyeshadow palette collection.
The type of eyeshadow palettes that includes basic colors that y'all want to accept in your makeup drove all the fourth dimension. And in case you travel with your makeup or you need to ship your makeup for some reason, you need to always take this type of palette with y'all.
And these are Neutral, warm, absurd, and colorful eyeshadow palettes.
Neutral Eyeshadow Palette

A beautiful selection is the Lorac PRO palette eyeshadow here, that has 16 high pigmented, super smooth and highly blendable neutral shades, ranging from white, taupe, espresso, black and others. You literally will use every shade.
The top row are matte and the lesser row has shimmery shades, and comes in a super convenient compact palette with a small-scale mirror.
Warm Eyeshadow Palette

A warm eyeshadow palette with orange, red, wine, browny tones in both matte and shimmery finishes. I beloved this palette here by UBACANE, a makeup brand that is super popular on Amazon, which offer bully high quality products at affordable prices.
The palette also has some colorful shades like different tones of yellow, dark-green and blue but mostly is a warm eyeshadow palette with also some blushes shades.
The pigmentation is swell, concluding all mean solar day and the variety of shades brand this palette a super complete palette that has everything on it.
Cool Eyeshadow Palette

Cool tones like majestic and blue are tones that makeup brands have a hard time creating the right formulation to make it a perfect shade. It'south non that elementary to make similar other colors, and probably that'due south why we can't detect a perfect royal eyeshadow without the patchy-looking eyelids.
A cool tones must-have palette is the Spotlight eyeshadow palette here.
Information technology likewise includes a cute range of cool tones, like bluish and purple, and has other colorful shades making it super versatile! And the toll is just correct (less than $20 for 40 shades)
Yous want to take Shimmer and matte shades in your eyeshadow palettes so you will be able to mix and layer eyeshadow textures with your middle makeup look.
You also need a matte black eyeshadow shade, and a matte night brown so y'all can get deeper on any eyeshadow look.
Related Makeup Postal service: Best Starter Professional Makeup Kits to Build your Collection the Smart mode!
WAIT! Desire to apply Makeup like a Pro? Grab The Ultimate Professional Makeup Packet and learn the Makeup basics, with pro tips, cheatsheets, face charts, SECRET professional makeup techniques & more than!
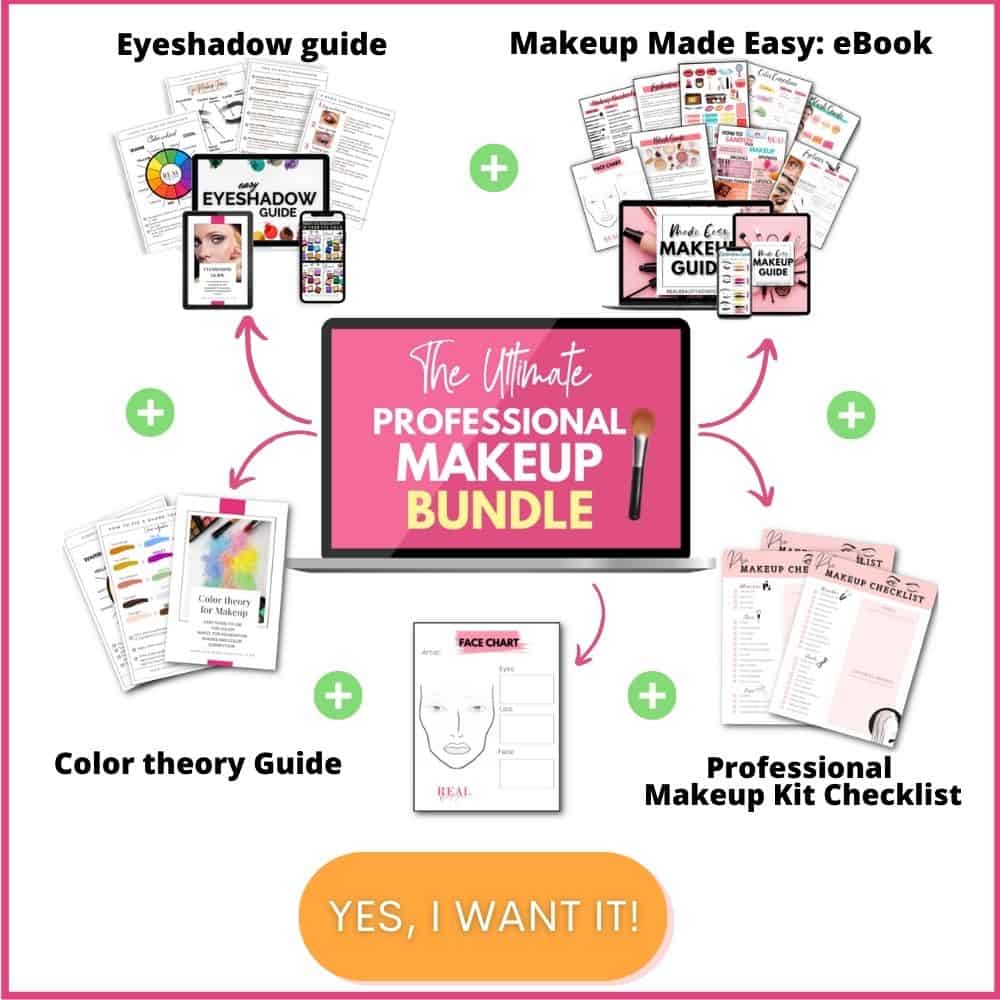
Click here to go more info almost this parcel.
Selecting your colour shades for your center color
To select the right color shades that volition make your eye stand out and expect cute, you must seek the opposite colour of your eyes in the color wheel. For example, if your eyes are dark-green, colors like reddish, pinkish, and orange volition contrast your eye color. Considering pinkish is the exact contrary of light-green.
Allow's see the color wheel for Makeup.

The complementary contrary color brings out your eye color no matter the shade. Like any other makeup rule, you can apply the same heart shade as your heart color if you desire, but it will blends with your eye color and it won't accentuate or bring out your eyes.
For instance, if y'all accept blueish optics, and yous utilize a blueish eyeshadow information technology detracts from your middle color simply if you take a bronzy warm color and add it to your eye, information technology will brand your eye look bluer.
The point of this method is always using complementary opposites to bring out the eye color.
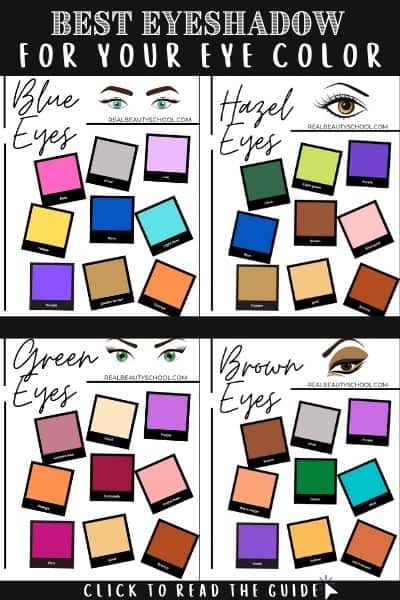
All-time Eyeshadow Colors for Dark-brown optics
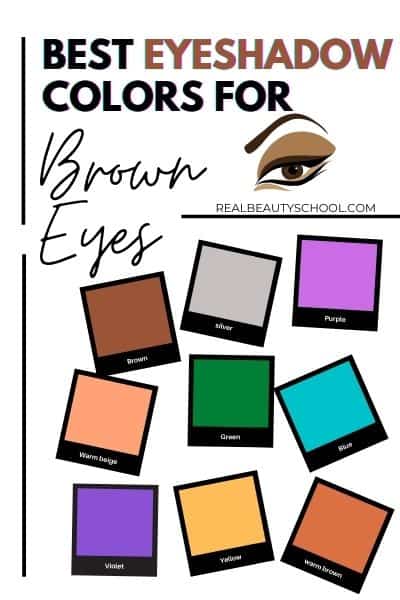
I like to phone call brownish eyes, "universal" because if you take brown eyes you lot can but play with the colors and you won't be competing, you can choose whatever shade you lot want.
However you can enhance your dark-brown eyes, playing with the undertones that your dark-brown eyes has.
If your brown optics have a little more aureate to them, the copper, bronzy or purple shade will stand out that gilded tones.
If your brown eyes are darker with warm undertones, blue, violet, royal will stand out that warm tones.
If y'all have deep, almost black-brown eyes, yous can use literally any color you lot want, similar silver, green, pink, orange, etc.
All-time Eyeshadow Colors for Green optics
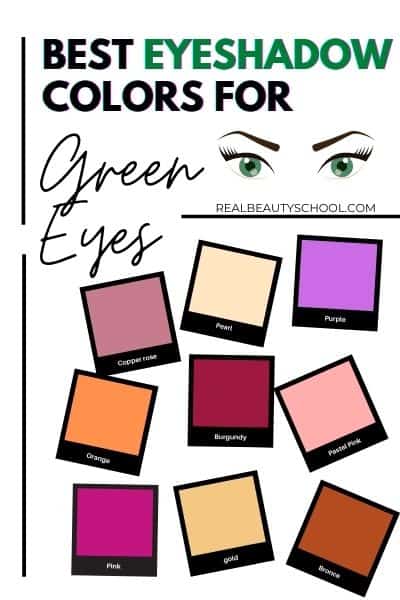
The all-time eyeshadow colors for green optics are purple, burgundy, orange, bronzy, gold, pink, pastel pink, copper rose, and pearl.
Whatever warm shade will make your green eyes the focus and that's the goal.
Best Eyeshadow colour for Blue Eyes
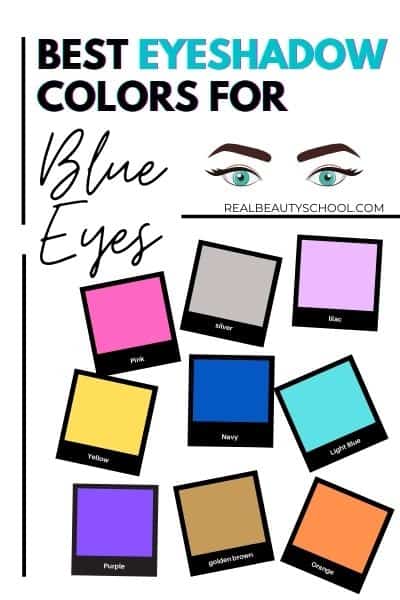
The best eyeshadow colors for blue eyes are bronzy, gilt brown, yellow, orange, neutral brown, pink, silver and imperial.
You tin can employ some blues. If yous have deep blue eyes, you tin can utilize light bluish and if you have light blue eyes, a navy colour. To heighten your natural blueish.
Best eyeshadow colors for hazel greenish eyes
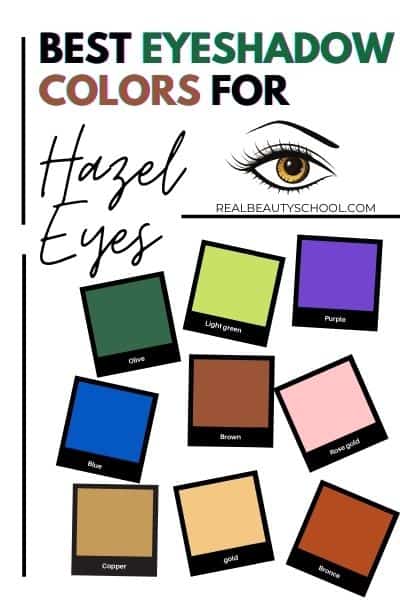
The best eyeshadow colors for hazel eyes are burgundy, warm browns, purples, blue, bronze and rose golden.
There are two different types of hazel eyes. The mixture of bluish and green hazel optics and the mixture of green and brown hazel eyes.
If y'all want to stand out the blue, go for coppery, warm shades and if you desire the green to bring out go for the burgundy and the purples.
If y'all have greenish and brown hazel eyes, you want to stand out the greenish with colors like warm, coppery, burgundy and purples.
This is a simple color guide and you can play with the different tints, tones, and textures of eyeshadows to create unique eyeshadow looks particularly for your middle colour with the post-obit eyeshadow techniques that I want to teach you today.
How to Use Eyeshadow Step-past -Footstep
I will walk your through some of the most bones and popular eyeshadow techniques that are essential to know, especially if you are starting with makeup.
In one case you know and boss ane or ii eyeshadow techniques, y'all can mix and match between two of them also equally play around with the colors to encounter what works for you best.
5 Basic eyeshadow techniques for beginners
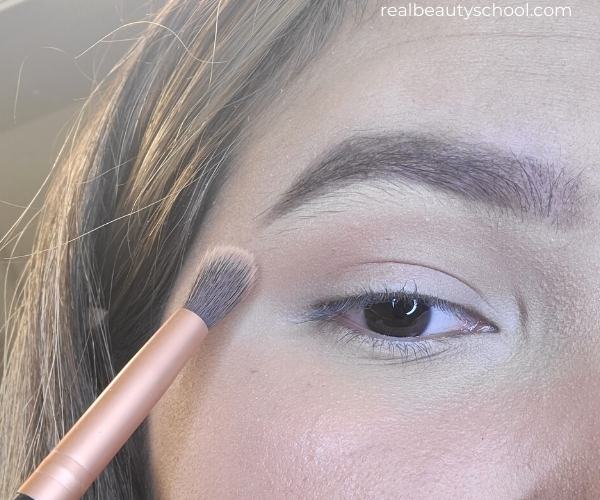
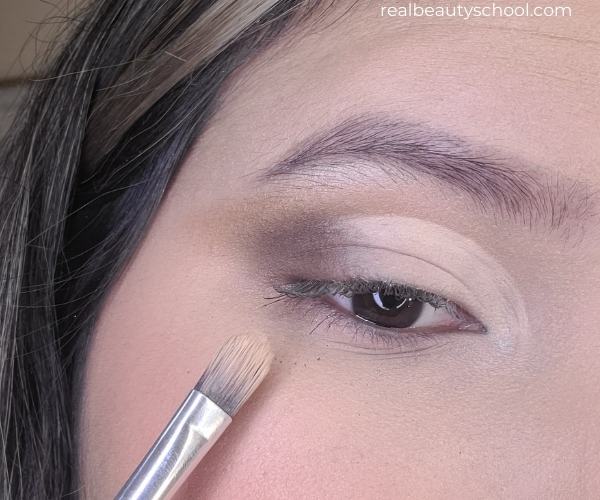
Eyeshadow technique ane: Day Neutral
This is eye makeup that can accept you less than 10 minutes and it's perfect for a engagement during the twenty-four hours or just an easy everyday makeup routine.
1. Start by applying an eyeshadow primer, I love to use my tarte concealer as an eyeshadow primer. And then set your eyelids with a translucent pulverisation or face pulverization.
ii.Next, take a warm light transition shade and apply information technology directly to your crease with a fluffy blending brush and go back and forward from your outer corner to your inner corner of the eye.
3.Build the color equally much as you want by going back to your eyeshadow and reapply it on the pucker.
4.Later on that, take a darker but all the same neutral shade like a neutral brown tone and with a more than precise pencil brush employ information technology on the outer corner forming an inverted V.
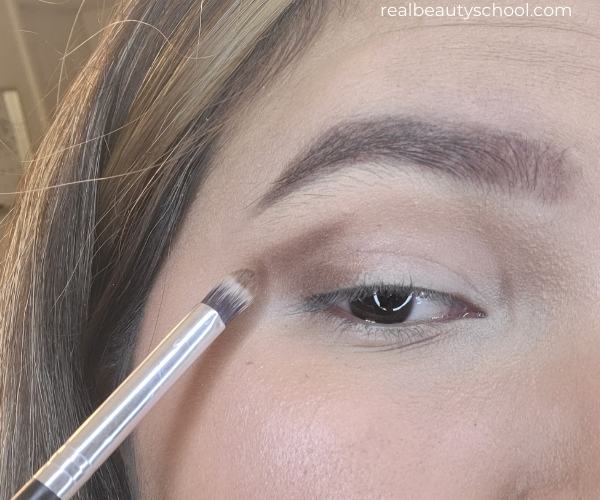
5.Y'all want to place the color in the outer corner and one time yous feel similar there'southward no much color on your castor, y'all can get-go blending the shade upwards with round motions and a fluffy blending brush.
Information technology's now upwards to you how deep you want your centre to wait. You tin can become for a darker brownish and build that deepness on the outer corner area if you desire. For this "Natural" eyeshadow technique, I'm merely leaving the await with a medium brown.
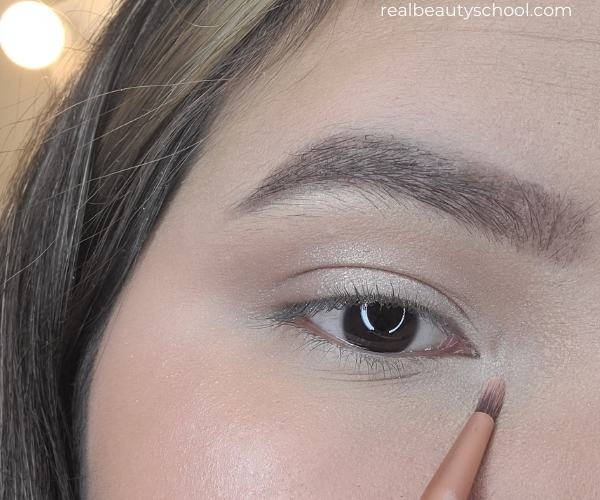
half-dozen.Later on that, highlight the chapeau with a shimmery rose gold shade. Take a clean blending brush and blend all the colors until you see no harsh lines.
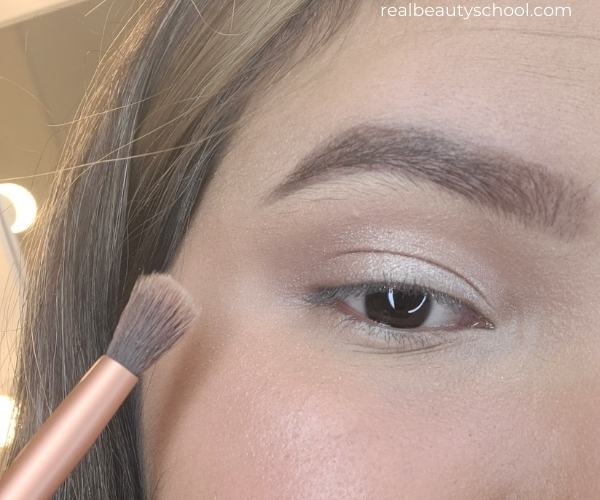
seven.To finish, take a lite beige shimmery shade and highlight the brow os and the inner corner of your heart. And employ the same medium brown on the bottom lashes expanse.
I dearest to utilise false eyelashes, even when I'1000 doing a natural day makeup await. so I'm crimper my lashes, applying mascara and a natural pair of false lashes.
You don't demand to use eyeliner for this "Solar day makeup" look, merely you tin apply information technology if you like.
Eyeshadow technique ii: Halo eyes
If yous are new on my weblog, yous probably don't know that I have hooded eyes, this blazon of eye is supper common and honestly is super challenging to work with for different center makeup looks.
And a I take a total tutorial with my pro tips and tricks to go the perfect Halo eyeshadow look for Hooded eyes.
Halo optics is one of the bones eyeshadow makeup techniques that once you mastered it, y'all can permit your imagination do the residue and create unlimited numbers of eyeshadow looks that will look different and cute.
A Halo eye, is a eyeshadow technique that require 2-3 dissimilar shades, preferably on the aforementioned range of color to create a Halo within the eyelid, and enhancing the centre of the hat.
Allow me evidence you how.
First start with a transition shade and appy information technology on the pucker, the outer corner and the inner corner of the centre.
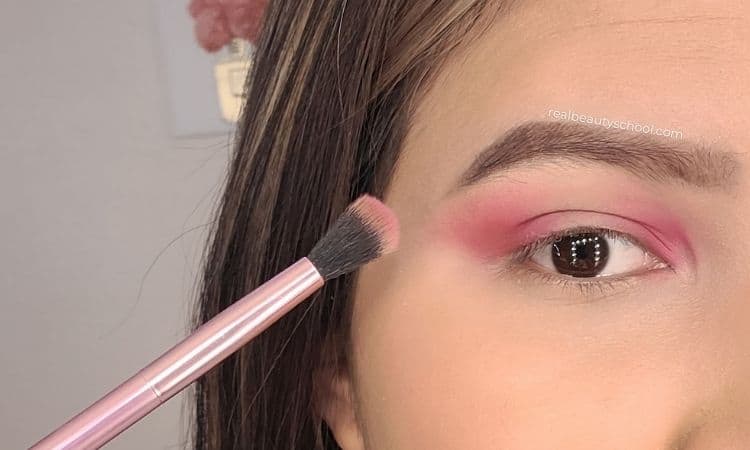
After that, accept a deeper shade on the same range of color. In my case, I'yard using a pink transition shade and a deeper pink as the second shade.
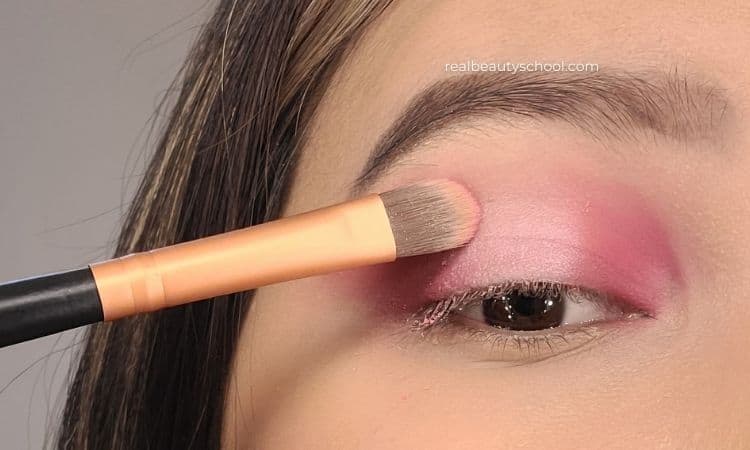
With a modest-to-medium fluffy blending brush and back and forward motions offset building a slightly gradient on your crease without touching the middle.
Some people besides apply color on the center of the hat, and nosotros are non doing that because nosotros desire to keep the center of the chapeau as low-cal every bit possible for the next shade.
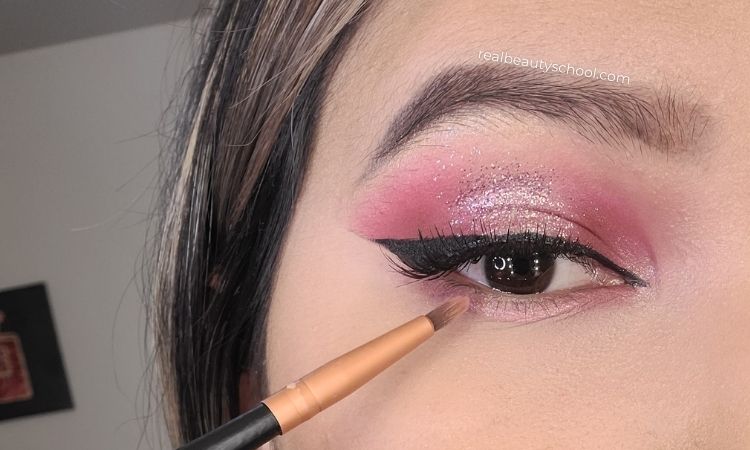
Now, take a light rose gold eyeshade and apply it with a wet small flat castor on the heart of the eyelid.
Y'all tin can leave your halo eye just similar that, or applying some rose gold glitter as well like me, to enhance the eye await fifty-fifty more than.
Use eyeliner, fake eyelashes and clean your under eye in case you accept some fallout.
Of import: To complete a Halo eyeshadow look, nosotros need to exercise the aforementioned equally we did on the eyelid on the bottom lash line.
Following the eyelid, use the first and second shade on the outer and inner part of the lesser lashline, equally well as the light rose aureate on the center of the bottom lashline.
The best part of this halo eye technique, is that y'all van create space version of it with different shades. Similar all greens, blues, purples, or blackness with silver etc.
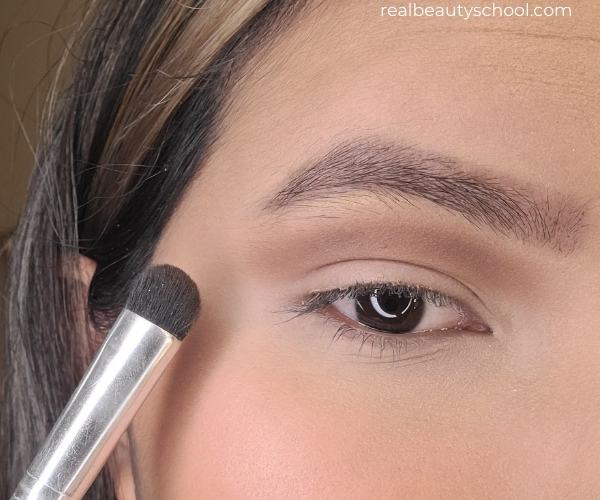
Eyeshadow technique 3: Smokey optics

The Smokey eye is a archetype! Is the bones eyeshadow technique that looks then beautiful and sexy and you but need 2-3 shades and tricks that I'thou most to share.
This eyeshadow technique is perfect for makeup beginners because it doesn't require so much precision or inventiveness, and looks stunning on a date night or a elegant night event.
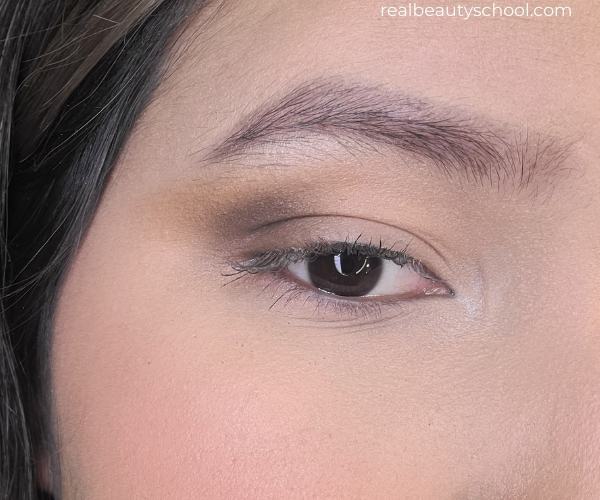
The archetype Smokey eye is the Black Smokey eye, and that's the one that we are covering on this article. But in example you desire to use this heart makeup expect for the day, check this Brown Smokey eye tutorial.
A common mistake with the Black Smokey center makeup look is not to apply a transition shade.
What volition brand this eyeshadow wait sexy and bronzy will be the transition shade.
Don't apply the black itself or a nighttime brown shade to this. Use a medium brown, bronzy shade on your crease as your transition shade.
The key of this makeup look is blending well the crease. Take your time when you lot are blending, most of the time is the part of the makeup that consumes more than fourth dimension but the flawless results are so worthy.
Have you lot e'er heard near Patrick Ta? Is a Celebrity and Models Makeup artist that is known for his bronzy, glowy makeup looks. In a Main class, he spent about 40-50 minutes simply blending 1 browny transition shade. And when he says that blending is everything, I think he actually hateful information technology.
Nosotros might not need that much time, but the point is if y'all accept time, and you desire to go a shine and flawless eyeshadow look without harsh lines, blending is the cardinal.
Now it's fourth dimension for the chief shade, the black. We desire an intensely deep black. In that location are some "black" shades that one time y'all apply, they expect more than grayish. We don't want that. Nosotros desire a existent black eyeshadow!
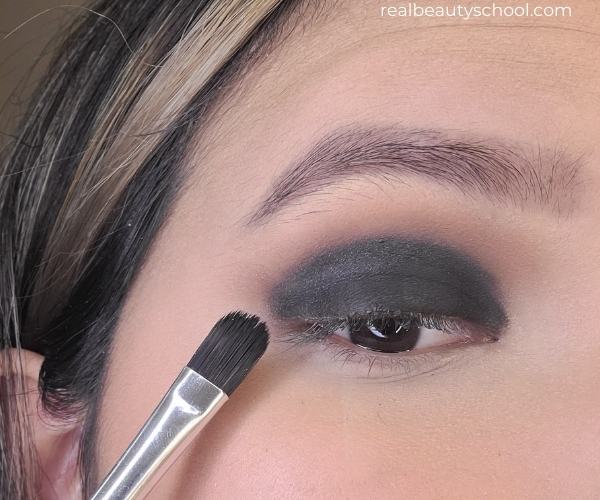
PRO TIP: Have a small flat brush and use setting spray or water to wet it before taking the colour, this tip will intensify the shade.
Appy it on the center of the center starting from the lash line in tapping motions, and and so distribute the colour on the eyelid until the crease.
If you feel that you need to take more color, exercise it and build the intensity of your Smokey eye.
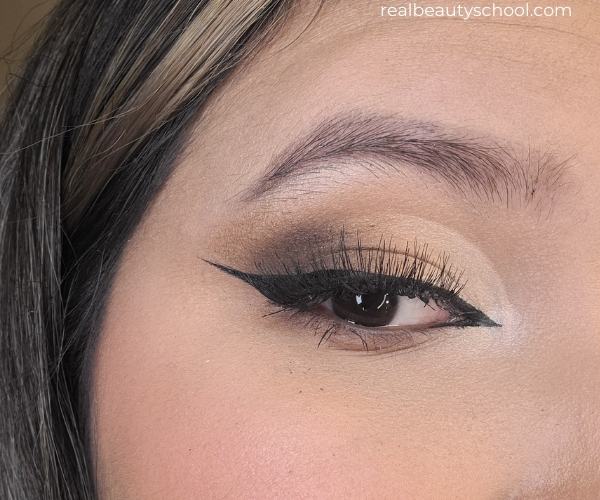
At present, take a clean blending brush and blend everything well until you lot see no harsh lines on your smokey eye. Finish the look applying highlighter on the forehead os and the inner corner of the eye.

PRO TIP: accept a makeup remover wipe to clean the under eyes expanse if y'all had some fallout (I just use makeup remover wipes for this purpose, never to remove my makeup on the night!)

For the bottom lashline, we desire to smoke that out also. Then we demand to get-go with the transition shade and a fluffy castor, then, take the black shade and utilise it with a more than precise brush to create like a small and smoothen smokey eye on the bottom eye as well.

Then employ faux eyelashes and a winged eyeliner if you lot want your eye wait more elongated.

Eyeshadow technique 4: I Colour eyeshadow
The one-color eyeshadow technique is definitely my go-to for an everyday makeup wait when I'm in a rush. And let me tell you that is a super cute makeup technique that with some pro tips will actually make y'all look more awake and prettier in minutes.
Equally the name says, nosotros are using just one shade for this wait, and this tin can exist virtually any shade. What I recommend is a "blush" shade or a shimmer shade.

If you like the glowing skin makeup look, try a shimmery shade, like gold, silverish, rose gold etc.
To create a beautiful monochromatic makeup look, take a blush shade and like peach, rose, red, mauve.
In one case you pick your shade, make sure you have a similar shade to utilize as a chroma (you lot can utilize the same) and a similar color of lipstick.
Take a pencil castor and apply your shade all over the lid without reaching the dark-brown os. So use a highlighter on the brow os and the inner content of your middle.
Cease the look with false lashes, the same shade as blush and a similar lipstick.
Eyeshadow technique 5: Soft Glam Cut-crease
The next makeup wait is more than like an evening or night eyeshadow look and is also known as degradient look.
To commencement pick a transition shade and centre the shade on the outer corner of the eyelid towards the crease, just without taking the colour to the center of the eye.

Side by side apply a darker shade and with the same blending brush on circumvolve motions, create a gradient upshot on the outer corner of the eyelid.
Now nosotros want to add some calorie-free to the eyes, and to do It, we are doing a One-half-cut pucker.
How to practice a Cut-crease
- Take a minor and thin constructed brush
- Apply a super light liquid concealer
- Follow your natural pucker (look if y'all have hooded eyes or monolids)
- Use a tiny quantity of production and add together more as yous demand.
- Practice, exercise and exercise!
If you have hooded eyes (similar me) you need to check this cutting-crease for hooded eyes guide, because you lot demand to do things a little bit unlike than the rest of the eye shapes to rock the cut crease appropriately.
Now picking a low-cal shade and apply it where you practical the concealer.
Pat the color kickoff and then blend it with a clean blending castor. Now to create a beautiful result, have the same transition shade and utilise it between the darker and the lighter shade to create a gradient consequence.
Accept your time to blend all the shades until you take no harsh lines (except the cut crease) on the center makeup look.
For this expect is optional using false lashes or eyeliner. However you lot want to add some drama if you are wearing this look for the nighttime.
Related Postal service: How to Pick the Right Concealer for Cutting the Crease

All of this eyeshadow techniques are simply the basics and you can at present mix and match dissimilar colors, textures and eyeshadow finishes based on the tips provided here.
How to apply eyeshadow for every eye shape
The reality if that yous can basically wear any makeup look regardless your middle shape. Still, there are some specific tips and tricks for every middle shaped to make them pop and await stunning.
There are half-dozen main center shapes, monolids, hooded eyes, almond eyes, downturned eyes, upturned eyes and round eyes.
And here are my best tips to enhance every eye shape with eyeshadow.
Monolids
- Cut pucker, Halo eye and smokey eye are the all-time eyeshadow techniques to enhance the pucker.
- Do not become also thick with your eyeliner on the upper lash line
- Article of clothing a winged eyeliner
- Shimmery and glittery shades on the heart of the eyelid
Hooded eyes
- DO Not follow your natural crease when creating eyeshadow looks that's enhance the crease
- Half cut crease, and slope eyeshadow techniques are the best for hooded eyes
- Wear natural looking false eyelahses with a clear band.
- Do not go too thick with your eyeliner on the upper lash line
- Do non do your eyeliner with your optics airtight. (Check this tutorial on how to exercise the perfect winged eyeliner for hooded eyes)
Almond eyes
- Basically whatsoever eyeshadow techniques goes will with almond eyes
- Article of clothing false eyelashes just on the outer corner of your lash line to elongate even more your eyes.
Downturned Eyes
- A cat eye slope eyeshadow technique will help to lift downturned optics
- Go out the lesser lashline without color
- MUST do a winged eyeliner to lift the optics
Upturned Eyes
- To empathize even more than your eyes, keep the volume of the eyeshadows on the outer corner of your eyes
- Imagine an directly line and blending towards this management instead of going up.
- Always blend outwards following your natural pucker
- Do not overextend your outer corner, keep information technology rounded to compensate your middle shape.
Circular Eyes
- Avoid the halo eyeshadow technique
- A cat eye will be your best friend to residue the eye roundness
- Winged eyeliner is a MUST but merely apply a thin line on the outer corner of the eye and in the inner corner, leaving the centre of the eye without eyeliner.
- Extend your eyeshadow outward to elongate more the eyes.
- Keep the lower lash line very minimal
As well the makeup tips and tricks y'all can employ, you need to know how to employ different textures of eyeshades, like cream eyeshadow, glitter eyeshadow and shimmery eyeshadows.
How to apply foam eyeshadow
The best style to apply a cream eyeshadow is by using a synthetic brush or your fingers and place the product directly to the eyelid, leaving information technology on the centre and blending it towards the inner and outer corner of the eyelid.
I recommend foam eyeshadow when yo are doing a monochromatic eyeshadow look as a i shade await, or to enhance even more a low-cal shade on other eyeshadow technique.
However, cream eyeshadow is non the best pick if you have oily lids.
How to put on glitter eyeshadow
I just simply honey using glitter on different areas on my makeup looks. I feel like past just applying glitter the entire makeup wait is improved and with more glamour.
The right way to utilize glitter eyeshadow is by using a minor synthetic castor, have i-two drops of glitter gum and place it on the desired surface area, expect ten seconds for the glue to dry and with the fingers apply the glitter on meridian the gum.
To apply a pressed glitter eyeshadow, take a synthetic small flat brush and employ it on borer motions on the desired surface area. This is and then much easier than using gum and loose glitter.
And highly recommend this inexpensive pressed glitter palette here from amazon. Information technology's my go to every time I desire to add together smooth to my makeup looks super easily.
How to apply shimmer eyeshadow
Almost every palette on the market includes at least 1, two or more shimmer shades. And this is necessary to play with the different textures of the eyeshadow and create beautiful makeup looks with different finishes.
Sometimes shimmer eyeshadows crave some assist to look pigmented, and to quickly set up that, y'all tin can use a wet brush to apply your shimmer eyeshadow.
Another simple way to apply shimmer eyeshadow is by using your finger and tap the colors on the desire area. Using any of these techniques is more than effective than using a uncomplicated eyeshadow castor.
Tips for the best Eyeshadow application
- Always prime number your lids. Whether you lot apply an eyeshadow primer, foundation or concealer, is super of import to prime your lids to raise the color of your shades, even your eyelids skin tone and to brand your makeup terminal longer.
- Have your eyeshadow brushes clean on hand. Clean your brushes regularly is a very proficient do, to avert ruining your eyeshadow looks with muddy brushes with unlike colors, and to avoid irritation on your eyelids.
- Be careful with the reds. Those beautiful red tones that are perfect for a Valentine's Day makeup look can be more difficult to remove from your eyelids than other shades. Avert using this tones to prevent having a hard time, and center irritation when removing your makeup.
- Layer textures with your shades. Combine unlike textures and experiment with your eyeshadows, to enhance the colors like using a cream eyeshadow as a base of operations and then apply a pulverization eyeshadow on top to make the color look more intense.
- Fake eyelashes! In case you feel like your makeup look is not finished or something is missing to consummate the wait, endeavor applying false eyelashes. Y'all can automatically amend your eyeshadow look with a pair of falsies. Here's my beginners guide to simulated eyelashes with pro tips and recommendations.
- The Clean blending brush tip. When doing your makeup, always take a make clean with no color blending brush on hand, then yous can blend your makeup without adding more colour or softly remove excess of color with information technology.
- Practice! Practicing volition improve your makeup skills by fourth dimension, just be patient, you can do it!
- Use a face nautical chart. Models are not ever available for practise, and you can have a hard fourth dimension removing your eyeshadow over and over from your eyes. Use a blank confront chart where you can practice your makeup without the necessity of models. Cheque my beginners makeup guide ebook here, it includes a face chart to practice makeup over and over again unlimited times.
Terminal thoughts on the beginner'due south guide to applying eyeshadow
This whole post was the nuts of eye makeup theory, terminology, and eyeshadow application, and now is your fourth dimension to take action and start recreating these makeup techniques with your ain twist!
The most important is to know your heart shape, and based on the best eyeshadow colors for your center color, pick the correct eyeshadow technique and enhance your natural beauty with a flawless eyeshadow look.
I hope you find this post helpful, if so please share with other and pin it for afterward! And in the annotate below permit me know what is the the eye makeup part that make you struggle the nigh? I'd love to hear from yous!
Goodbye-bye!
Valeria.
Related Eye makeup posts:
- How to Stop Eyeliner from Smudging and Smearing (Secret Hacks you demand to Know!)
- What is the right order to use makeup?
- How to prep your skin for flawless makeup
- The Ultimate Guide to Use Foundation similar a Pro
- How to Custome any Foundation Shade with the Primary colors
How to Apply Eyeshadow (#1 Beginners Guide with pictures)

How To Apply Eye Makeup Step By Step With Pictures,
Source: https://realbeautyschool.com/how-to-apply-eyeshadow/
Posted by: sainanderser.blogspot.com
0 Response to "How To Apply Eye Makeup Step By Step With Pictures"
Post a Comment